


November 02, 2011
Halloween 2011 - Homemade James the Train Costume
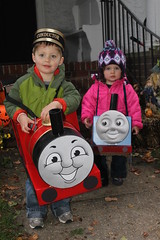 Surprise, surprise, Darren wanted to be a train again this year. But he wanted James this time around, so last year's Thomas costume could stay in the attic -- good thing, too, as the boy has grown quite a bit, so I think Thomas would have been busting his boiler with Darren inside.
So I got to return to the world of cardboard and spraypaint to make this year's costume. Originally, I thought I'd just repeat the same design as last year, only a bit bigger, but Amy pointed out that James looks a bit different than Thomas. He has a long round boiler instead of a square one, as well as a few other minor changes. Parental guilt kicked in, and since I was building a new one anyway, I updated the design along the way.
First up, supplies (with convenient Amazon links for the items you may not have), so you can follow along at home.
Materials:
- 2 12"x12"x18" boxes
- 10" diameter concrete form cardboard tube (comes in 4' length). Available at Home Depot.
- 2" diameter cardboard tube for the smokestack
- Something for the dome. I used a baby formula holder
- Paper tape (not really recommended, since I had trouble painting it)
- These cool paper fasteners
- String
- 2 Washers
- Ribbon for straps
Tools:
- Box cutter and/or strong scissors (I used a box cutter and kitchen shears)
- Ruler
- Right angle of some kind (for making sure cuts are at 90°)
- Hacksaw
- Pencil
- Optional: Drill/Dremel, handy for cutting holes in the cardboard tube, which is pretty thick
Primary construction
First, I worked on the back of the train. That's where all the cool kids sit. I stood one box up on the narrow side, and sliced it vertically to cut a 5-inch piece off one side, and 3-inch piece on the other (with some leftover in the middle). The 3-inch piece will lay down under the tube as a base at the front of the train, the 5-inch piece will stand up as the back.
Next, the spot for Darren. I put the other box around Darren and measured the depth he'd need, leaving some jacket-space, since it's usually cold on Halloween. I cut off enough of one end of the box so that this amount would stick out of the back piece. I kept all the box flaps in place, folded inside, to help with stability, and to mount things without having to mar the outside of the costume.
The front. I cut out a groove in my base, and bent the top flaps down, so the tube could rest in it. I then cut the base to the length I was looking for (I went with about 25" for the whole costume), but leaving the sides intact, so they could extend into the costume body and provide some structural support.


I cut the tube to length with a hacksaw. The tube will serve as the boiler. I had intended to leave a few tabs sticking out, to extend back into the costume body for stability, but in my giddiness to use a hacksaw, it slipped my mind.
 I attached the tube to the base using the paper fasteners. These things are great. The don't come apart over time like tape does, and easier to work with than nuts & bolts.
I attached the back of the tube to the main costume body just using tape. But I knew this wouldn't be enough to keep it in place, so I also ran a loop of string from under the front of the tube, through the tube, and into the costume body. Washers on both ends keeps the string in place. This pulls the tube up and back, keeping it tight against the costume body. Turning the washers twists the string loop, and makes it tighter. I'm glad I got that degree in costume engineering.


Also, at the front, I wanted to be sure that the boiler tube would stay flush with the bottom piece, to avoid a gap there. So I threaded a string through the corrugations in the cardboard base, into the tube, then back through another corrugation in the base to form a tight loop. This keeps the tube and the base together.


This thing was starting to look like a train.

Wheels
For the wheels, Amy cut 5-inch diameter wheels out of spare cardboard, using an upturned bowl as a template. I punched holes in the middle (How to find the middle of a circle), and attached them to the bottom of the costume using small nuts and bolts. This should allow them to spin.
The smokestack
On to the smokestack. I used a shipping tube this year instead of a paper towel tube, as it's a bit wider, and sturdier. I hoped to set up the same candy-collecting system I did last year, so a wider tube would cut down on candy-jams. I recommend using a Dremel or some other kind of power tool for the hole-cutting operation, as the boiler tube is difficult to cut through by hand. (Also, if you buy a Dremel from Amazon, I get a dollar) I made the hole smaller than it needed to be, and then used sandpaper to make it bigger until it just fits (again, a Dremel is great. A dollar is also great). A tight fit allows the tube to stay in place without needing any other kind of fastener.
Once I had the smokestack tube in place, I marked the height I wanted, and cut the smokestack tube to length. I had it go all the way to the bottom to help keep it in place. Slanted smokestacks are the mark of an amateur.
 Since I wanted the smokestack to function as a candy chute, I had some more work to do. I cut an oval hole in the side of the tube for the candy to come out of. I turned the oval around, and put it back into the hole at an angle, to make a kind of slide. Then I taped that in place, and trimmed the excess, so that I could still take the smokestack in and out.
The face
James' face proved a bit tricky. Darren insisted that I try to draw it with a crayon, but I didn't want to draw it by hand, since I'm pretty sure he can draw better than I can. I considered re-using Thomas' face from last year, since I didn't think anyone would really notice. But I also found this image of James the train online which I was able to blow up without it becoming too blurry. It didn't have the cool 3D look from last year, but that was okay, since I have lots of Graphic Designer friends. Unfortunately, they're all selfish jerks, so I had to work on it myself. I dodged and burned like a pro, and gave James some depth.
| Before | After (Full size here |
 |  |
 I had to print it at work, since my printer at home can't do 11x17 paper. Sorry work, I owe you $.10.
I pasted the face on with spray adhesive
Attaching the face to the costume body was even trickier. It needed it to be removable, so that I could access the inside to retrieve candy (and likely fix the whistle). I also wanted to avoid marring the front in any way. Otherwise, a screwhead might be mistaken for a facial piercing, and James is too vain for that. The best solution would be some kind of friction fit.
 I had some foam I got as padding in a recent Amazon purchase, and thought that might work well. I cut it to the shape of the face, and then trimmed about ⅛ more so that it was in a bit from the edge. Then I glued it to the back of the face with spray adhesive. It was pretty thin, so I added another layer. (In retrospect, a third layer would have helped.)
 I pushed it into the train, and it held in place. Excellent! I just hoped it would stay in place when a three-year-old starts bumping it around.
The Dome
Amy found a nice baby formula container with a rounded bottom that would work well for the dome. After removing the top, I trimmed the tabs a bit, since they extended up past the lip. I left some of the tabs in place, to help attach the dome to the boiler tube.


 I cut slits in the top of the boiler tube that would line up with the tabs. The container would then stay in place by pushing the tabs it into the slits. Perfect.
I was worried about the paint peeling off the plastic, so I scuffed the bejeesus out of the dome with sandpaper.
 In order to have it sit closer to the boiler tube, I Dremmel-ed curves into the front and back. I dreamed of what I'd do with all my Amazon dollars.
Straps
Amy had some wide black ribbon that was perfect for the straps. I made some slits in the cardboard where I wanted the straps to join the costume, then threaded the ribbon through (some tape folded over on the end of the ribbon made this easier). Once through, I tied knots in the ends to make sure the ribbon didn't come back through the slits, yet still allow for adjustment if needed.
One thing I forgot to do, which was helpful last year, as to wcross the straps in the back before attaching to the back of the costume. This crossover helps keep the straps from sliding off little shoulders Picking the costume up by the straps showed that the costume is front-heavy. No surprise, really.
The Whistle
I had last year's whistle assembly still intact, so adding it this year was pretty straightforward.
 Amy had the idea of putting the whistle speaker inside this dome, so it would be hidden, but still in a prominent spot so it could be heard -- it was too quiet last year. I took the dome back off, and cut a hole in the boiler tube wide enough for the sound player to fit through. (I could have cut a smaller hole just wide enough for the wires, but I didn't want to have to take apart my whistle assembly). I drilled a few holes in the front of the dome with a small drillbit to act as speaker holes.
 I taped a flat piece of cardboard to the trigger switch, lined it up with the candy chute exit, and secured it in place using the fasteners and tape. I should have put the chute exit and switch higher, to make sure that candy falls clear after it hits the switch, but I didn't think of that until too late. I'm risking candy jams now. This is truly living life on the edge.
 I ran the manual switch back into the main body of the costume, so that Darren can press it whenever he likes.
Painting/Details
Painting was pretty routine. I primed all the pieces first, to hide any printing on the cardboard, and to help the paint look even.
 I painted the red first, after covering the straps and all the holes with painter's tape and newspaper. Then I covered up the red sections and did the black.
The only problem I had is that the paint does not stick very well to the paper tape, and would come off whenever I pulled up the painter's tape.
After painting the dome, I was done
Amy was in charge of the detailing, and did a great job. She used construction paper, gold spray paint, spray adhesive, and a sassy attitude to make and attach all the details. It makes a huge difference.

Wearing it
Luckily, I got all this done about 5 days before Halloween, as we got hit with a freak snowstorm that took out our power for about two days, including Halloween. The town parade was cancelled, as was his school on Halloween day, so Darren only wore the costume once, for the actual trick-or-treating.
He had a great time, though. He pressed that whistle button the entire time. The face fell off a few times, we had a candy jam or two, and we had to adjust the straps a bit, but overall, the costume held up great. He was able to walk freely, turn, etc. I think it may have been too heavy, though, as he said he was done after just a few houses, but wouldn't really say why.
As a bonus, we offered Thomas to Ally, and she loved it. As soon as Darren got into James, she asked to get into Thomas. And she kept it on for the entire trick-or-treating experience.
Kevin, you are very talented and obviously very involved with your children. You are also very generous to share your ideas. I'm going to try and do a 'Thomas' for my 3-year old. Thank you.
Posted by: percy at October 23, 2012 09:37 PMThanks for your write-up. This is what my son wanted to be for Halloween this year. I used a hot glue gun to hold most of the cardboard together. I also found a round styrafoam disc for the face - it fit very snugly inside the cardboard tube. I only wish I had time to put your coop whistle together. Perhaps he'll still be into trains next year. Thanks again!
Posted by: Ann at October 29, 2012 01:31 PMThank you for the inspiration Kevin. I think my son will be very happy at the Carneval we attend in our country of Switzerland!
Best regards,
Helen
This has made my life so much easier. I'm not a crafty person and it would've taken me forever to figure out how to tackle my son's costume for this year. Thank you for posting this!
Posted by: Shannon Hudson at September 29, 2013 09:53 AM