


October 19, 2010
Halloween 2010 - Homemade Thomas The Tank Engine Costume
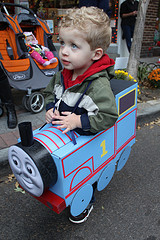 Darren's been pretty heavy into Thomas the Tank Engine lately, so we thought it would be a good costume for Halloween this year. I'm not a huge fan of the pre-made Thomas costumes, and I thought I'd have a good time making one, so what's what I decided to do.
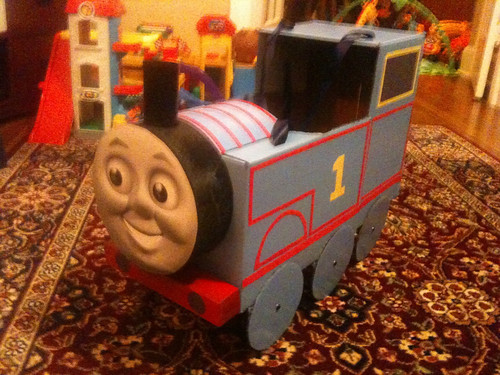
I liked the idea of using cardboard boxes and suspenders to basically hang Thomas around him. So I found some boxes that were just about the right dimensions -- 9in wide x 8.5in tall x 13in long each. (Keurig K-Cup boxes, for the record. I had to drink a lot of coffee).
Just laying out the boxes, I could already see a basic train form. I was optimistic.

I taped the boxes together with clear packing tape, and cut a hole for Darren to stand in. I had him try it on, and he seemed to be into it, both literally and figuratively. That was a good sign, because I'd like to avoid having to carry it around the neighborhood after he refuses to wear it. Let's hope for a warm Halloween, though, as there isn't much room in there for a jacket.

I needed a tube to create a nice curve along the top and circle at front. It took a while, but eventually I found an 8" cardboard tube intended to be a form for concrete columns. It was just about right. I got mine at Home Depot, but Amazon sells them as well.

I cut a 2¼-inch slice off the tube with a hacksaw, leaving a "tab" that will extend back along the top, giving the impression that the whole tube extends back. In train lingo, this is known as the "caboose."

Next I cut a circle in the top of the tube for the smoke stack. This proved to be strangely time-consuming, since this was tough cardboard. I went slow, since I wanted to have a tight friction fit, so I wouldn't need tape on the outside.
The smoke stack itself is just a paper towel tube. Amy wanted to have cotton "steam" coming out, but I had other plans. More on that later.

For the face, I traced the big tube onto spare cardboard, and cut a circle. A Google search for Thomas, a bit of Photoshop magic, and the "Print" button gave me the face. Here's the high-res Thomas face, for anyone trying to make this costume. It's not as sharp as I had hoped, but it still looks good.
I attached the face/smokestack/boiler piece to the rest of the train with some packing tape, hidden along the top. It was a bit shaky, so there's room for improvement here.
I made cardboard circles for wheels. Squares wouldn't have worked as well. Amy wanted them to be spinnable, so I attached them with small nuts and bolts instead of tape, my original plan.

I made a small slender box out of a manila folder to serve as the red part on the front (not pictured). On a train, this piece is called the "conductor".
I applied a spray paint primer to everything, which was probably overkill, but I didn't want the printing on the boxes to show through the final product. I got one of these spray paint trigger thingies, having learned my lesson on last year's Back to the Future costume. If you're going to be spray-painting for more than 30 seconds, I recommend one of these.
The blue paint I found was good, but lighter than what I wanted, but I suppose Thomas the Tank engine graffiti isn't too common, so the paint manufacturers aren't making any yet. The Red was a better match. (The Amazon links to the left are the exact colors I used)
After the paint dried, I cut slits for the shoulder straps. Amy found a nice ribbon in her sewing supplies, and I threaded it through the slits.

The last step was to apply the detailing. For this we just used construction paper and spray adhesive.
This spray stuff is great. I've used it on a few projects now. Everything sticks well, yet you have several minutes to reposition things if needed. Just make sure to do the spraying on a tarp or something, since the surrounding area may get sticky.
Amy did pretty much all the detail work, and it came out great.
I took the liberty of adding a few bells and whistles. Amy had a suggestion of adding a whistle sound to the train by getting one of those Hallmark recordable cards, and recording a sound from one of Darrens Thomas toys. I thought that was a great idea. I went to Hallmark, but all the cards play a song or other sounds after the recordable part, which wasn't helpful. So I went to Amazon and found this, for $1 more:
Its a keychain that can record and play sounds (presumably so you can record where you parked your car and then play it back later). This thing was great, and it disassembled easily, which made it even better.
I recorded a whistle sound from one of Darren's toys, and then took the keychain apart. I found the buttons on the circuit board, and soldered a wire to each connection for the "play" button, which were fortunately wide enough apart that my lack of soldering skill was not a problem.

I used my new Dremel to make holes in the casing to accommodate my new wires, and reassembled the keychain. If I had thought ahead, I could have had the wires come out the holes where the keyring attaches, since I didn't need that anymore.

Next, I attached two buttons in parallel to the other ends of the wire, so that pressing either would be the same as pressing the "play" button on the keychain.
I taped the pushbutton to a hidden spot that I thought Darren would be able to reach, and I put the other one well, let me digress for a moment.
At some point during construction, I realized that the smoke stack was just the right size for a piece of candy. I thought it would be cool to be able to drop candy down the smoke stack and have it collect inside the costume. So I cut a hole in the front of the train body, behind Thomas face. Then I angled a short piece of paper-towel tube from the bottom of the smoke stack, through the hole, and into the box. I taped a Tupperware bowl underneath. Now if I dropped candy into the smoke stack, it would slide into the train and land in the Tupperware.

To make things even cooler, I positioned the other switch from the keychain rig just at the end of the tube, so that falling candy would hit the switch.

The result: A Thomas that whistles when you drop candy in his smokestack :
The first outing
We went to Tarrytowns Halloween parade, and Darren put on the completed costume. He had a great time putting candy down the smoke stack over and over. And over. It was hard to hear the whistle sound once he was in the costume, though, particularly with the parade going on.
I was surprised at how long he was willing to wear it. It helped that we told him people would give him candy if he wore it.
The costume held up better than I thought it would, which is great, as there are still two more Halloween events on our calendar.
Also, please note that I have been replying to commenters via email, but I'm not great about posting the replies here, so feel free to ask questions, and I'll get back to you.
Wow, great project! Well done.
Posted by: Max at July 24, 2011 02:24 AMReally cool!!!! Thanks for putting this out there. I have to make this happen for my son. He is 4 and has been completely obsessed with Thomas for 3 of the 4 :)
It's pretty crazy, we actually live in Valhalla and went to the T-town parade last year as well... I'm curious, what do you have up your sleeve this year?
Posted by: lauren at August 11, 2011 08:51 AMI love this, and I am in the process of copying it :D. My 3 year old will be Thomas, my 8 month old will be Percy, my husband will be Toby or James (we haven't figured out the tender yet), and I will be Rosie.
Just curious, what were the approximate dimensions of your boxes. They worked out well.
Reply from Kevin: They were 9in wide x 8.5in tall x 13in long each. I've added this info to the page as well. Thanks for asking!
Posted by: Whitney at August 21, 2011 12:49 PMOMG!! you did a freaking cool job i was looking at making my son's thomas costume there is NO WAY i can make it as cool as yours!!can't wait to see what you do this year .oh by the way what did you do with the train after halloween? just wondering?:O) mahalo!!
Posted by: zoe at August 25, 2011 08:25 PMi was doing a search for thomas costumes and found your blog. so cool! i just bought all of the supplies to try to make this for my little dude. i hope it turns out well!
Posted by: Augusta at October 17, 2011 08:28 AMWhere did you find your Thomas face?
Reply from Kevin: I found the face after an exhaustive Google Image search. Then I cropped it and enlarged it with Photoshop
Posted by: Mary at October 17, 2011 11:06 PMThe proportions of your engine are really nice. Thank you so much for publishing the instructions online! Glad you included the high res pic of the face. The candy shoot/whistle is very clever. Were going to attempt to use red electricians tape for the red line details (I didn't see if that is what you suggested, but thats what it looked like to us). Thanks again.
Posted by: Kristi at October 23, 2011 09:01 PMCool post. We have a few train hobbiests use our modules in their trains. I work for a company that sells DIY kits where you can program your own sound modules for greeting cards, boxes and gifts, scrapbooks, toys, robots, and other DIY and craft purposes. We got up to 3 buttons, modules that can hold up to 20 sounds, and 200 seconds, and high quality sound (not like the stuff you see in stores). Check it out and please comment!
http://store.bigdawgspromo.com
Posted by: Mark Wilson at April 14, 2012 08:51 PMWhat a great idea. My son is turning 4 and he LOVES Thomas the train. I am going to make this for his birthday party. Thank you for sharing it :)
Posted by: Nermeen at May 22, 2012 12:27 PMi'm totally new to this type of stuff but am going to attempt this costume!! I REALLY like the whistle recorder. What kind of wire do i need it get to solder them together?
Reply from Kevin: The wire I used was what RadioShack calls "hookup wire", though I'm sure other kinds would work as well.
Posted by: Chel at September 19, 2012 04:36 PMThank you so much for posting your step by step instructions. I am going to try it for my son this year. He is 4 1/2 and has been a huge fan since before he was 2. This is the year to make the Thomas train costume happen. I love what you did with the whistle recorder!
Posted by: Alicia at September 20, 2012 02:04 PMLove this! I am in the middle of attempting it and have a question. How did you get the portion of the cardboard tube that forms the caboose to attach to the rest of the train?
=================
Reply from Kevin:
You've come across one of the trickier parts, and one I admit I didn't do a great job on.
What I did initially was just tape where I could. I used folded-back tape on the inside of the top tab piece, and also taped from the outside along the bottom of the face, before I attached the front red bumper.
But the tube piece still came off the costume after a few days. So the next year, when I was making a James the Train costume, I improved it a bit with some string pulling from the inside. Photos and such here:
http://www.kevincooney.com/archives/000175.php
But even that I messed up a bit. I think the best way to attach it is to leave tabs as you cut the big tube piece, and cut corresponding slits in the front of the main body for the tabs to slide it into. I intended to do this with James, but it slipped my mind while cutting.
So if you haven't cut the tube piece yet, just leave a tab or two when you do, and you should be fine. If you've already cut the tube piece, perhaps you can just cut out 1/4" more to leave a tab. Otherwise, some combination of string (like the James costume) and tape will probably hold up for a few hours at a time.
And how did you get the two boxes to hold to each other? I have some ideas hot glue or staples, butI'm curious what you did. I just want the most sturdy option I can come up with.
Reply from Kevin: I mostly just used packing tape, which held up okay, but not great. The next year I used paper fasteners, which I really like now.
Posted by: Jessica at October 8, 2012 01:39 AMI just made one for my daughter that loves thomas. I used red ribbon for the pinstripes and tons of hot glue. thanks for the instructions
Posted by: Andrea at October 17, 2012 06:19 PMThanks so much for figuring this out and sharing! I looked creative & like super mom this Halloween AND my son won best costume :-) I didn't do it exactly the same. I used tape on the outside, including doing all the red & yellow with electrical tape and all the black with duct tape. I dressed as Sir Topham Hatt and my 2 1/2 year old was thrilled with both costumes lol.
Posted by: Natalie at October 27, 2012 10:43 PMThank you so much, for all the details. I love the idea of the candy slide into bowl!
Posted by: jes at October 30, 2012 08:00 PMThanks for this post. My son is almost two and is obsessed with Thomas. I followed your instructions and made a Thomas costume for him. It came out great! I can't wait to see his face when he sees his Halloween costume tomorrow!
Posted by: Ashley at October 30, 2012 09:50 PMThank you so much for posting your adventures. We had great fun building our own Thomas, and our wee boy has had a great time this evening. It's all been so exciting, can't wait till next year.
Posted by: Jan at October 31, 2012 04:18 PMKevin, we made our 3-year old a 'Thomas' costume this halloween (today) by following your instructions. Some minor modifications for convenience. Enjoyed building 'Thomas' over a few nights. Cyrus and we are delighted by it. And we had a good time trick-or-treating today despite rather cold and wet weather. Thank you for sharing. You've had a big part to play in the Halloween that we've enjoyed.
Posted by: Percy at October 31, 2012 09:19 PMThanks so much for sharing! I had a lot of fun building this for my Thomas-obsessed 3 yr old. I've received tons of compliments on it and was even called, "best mommy in the world"! =o)
Posted by: Liz at November 2, 2012 12:44 PMYour son's Thomas costume is AMAZING!! Can you tell me how you joined the two boxes and the form tube? Am not sure if you taped them, and if so, with what, or whether you used the spray adhesive, hot glue??
Posted by: Alice at February 20, 2013 01:54 PMI'm so glad I found this, it is the best diy Thomas costume on the whole internet, we looked. We made this for our 6 year old little brother, he just loves it.
Posted by: Agota at March 17, 2013 02:18 PMgreetings from Egypt.
This link is so useful, i made it for my 4 year old and he loved it.
Thank you
Hey, for the train whistle idea I was thinking the create your own sound from Build A Bear Workshop stores may work well cause its a push button, at least for the manual option!
I am using your tutorial for my sons costume this year, so excited! Thank you for your time and dedication :)
So glad I found this site. My 2 year old son is also obsessed with Thomas and I've been looking for a costume for him and haven't liked any I've see. Guess I better get my butt in gear and gather stuff to make this one. Thank you so much for all your instructions. Great post! Now to go look at your James one for more inspiration!
Posted by: Melissa at September 1, 2013 09:38 PMMy son is in love with THOMAS and refuses to be anything but. I looked all over the Internet and when I found your site I said I have to attempt to do this in order to make my little one happy. My questions to you is:
What types of nuts and bolts did you use?
What did you make the wheels out of?
Did you use construction paper or tape to make the curves/outlines on Thomas or was that done with spray paint also?
You did an amazing job I hope I can accomplish this in the next few weeks before Halloween.
Posted by: Niki at September 16, 2013 12:47 PMThank you so much for posting these instructions! When my 2 year old son told me he wants to be Thomas this year, my heart sank (I can sew pretty well, but how to sew a train?) Your blog has saved our Halloween! We're from Tarrytown too, so if you see a little copy of your amazing costume walking around the parade this year, please say hello to us! :)
Posted by: Erika Greenberg at October 4, 2013 08:25 AMTHANK YOU!!!!! I am going to try this and the detailed instructions AND the product links are so amazing. Thank you, thank you, thank you for giving me a chance to be a Halloween hero!
Posted by: Christy at October 10, 2013 09:15 AMThank you so much for sharing your craftiness with the rest of us. My Dad and I are going to tackle this project together this weekend for my 2 year old son Benjamin's Halloween Costume. He will flip out when he sees the finished product. Thomas is his while world!
Posted by: Jen Ireland at October 10, 2013 12:15 PMMany thanks for the excellent instructions. I built a slightly larger version but your directions were imperative.
Posted by: Gerry Dewil at October 12, 2013 09:49 PMThanks for the awesome directions. I'm in the process of building this for my 2 year old obsessed Thomas fan. Thanks again for sharing your ideas and creativity!
Posted by: Mandy Borland at October 18, 2013 07:08 PMthank you for the great direction, since I have twins I had to make two of the trains for them. They were a big hit thank you so much :) I set the bar high for next year. If you send me your e-mail I would love to send you a photo or two of them.
Posted by: Connie at October 18, 2013 09:00 PMThank you so much for posting this! I am currently making a replica (minus the train whistle, however, that was ridiculously ingenious!) My son is almost 3 and also a huge Thomas fanatic. He is so excited and it isn't even finished! Your directions were so easy to follow and took the guess work out of everything. :) I can't thank you enough!
Posted by: Katrina at October 21, 2013 08:07 PMYou should be making and selling these!
Posted by: Alanna at October 23, 2013 05:04 AMDear Kevin,
Thank you so much for posting the details and pictures for everybody to use as a guide to make Thomas costume. You have and continue to make lots of kids happy. I am not very good at these projects, but you have motivated me to give it a try. It's almost a last minute thing now with Halloween being three days away and all have ready are the two boxee, the kaboos and the motivation to do make it work:).
I had a question for you. How have you attached the wheels with nuts and bolts. Is it bolted to the front box? Or is there anything else underneath the two boxes?
Also, does it make sense to cover the boxes with blue paper instead of coloring them?
Thanks for your help
Regards
Nidhi
Awesome! I made this costume for my son, and it turned out great.
I knew I wanted to make a Thomas costume out of boxes, but your ingenuity saved me so much time.
Thank you so much for sharing this - great job!
Here are some pics of my son's Thomas costume, and my Sir Topham Hatt getup - did you know you can spray paint a t-shirt? :)
https://drive.google.com/folderview?id=0B8CzUpN_T1i3ckhoVDBqTVM3SmM&usp=sharing
Thanks again
Ramon
You are a genius!!!
Posted by: Bridgette at October 30, 2013 04:51 PMDear Kevin,
Thank you for your wonderful ideas and help. I made the costume for my little one this year (2 1/2 years old). I did it sans the chute and the whisle-- I wouldn't even dare to go as far as you did. But it turned out great. He's the type who asks to take the candy in his hand and then puts it in his bag himself proudly to show grandma his loot. The whisle wasn't even neccesary; he was choo-choo'ing the whole time! And he did NOT want to take it off at the end of the evening. It held up great, and I know he will use it to play around the house until it's destroyed...
FYI, the cardboard tube i found was quite expensive, so I ended up using a big tin of Export Sodas (which I had a contractor cut up and then put silicone glue to protect the edges). I also swapped your construction paper for foamies, which ended up holding up better in the humid weather we have in Puerto Rico.
People were taking pictures of my son, they liked the costume so much! I'd love to send you a picture, but don't know where. Thanks for the inspiration!
Melissa
Your tutorial is awesome. My Thomas turned out huge and utilized a whooooole lot of red duct tape, but it still looked fantastic.
Thanks again.
Here's a pic.
https://www.facebook.com/photo.php?fbid=10151826018329232&set=a.130850989231.106019.681714231&type=1&theater
Posted by: Jennifer Quesada at November 1, 2013 11:35 AMThanks so much for the tutorial. I used it as a starting point for my son's Percy costume this year and it came out great!
Posted by: Ruth at November 2, 2013 12:54 AMSorry, the URL for the comment above didn't seem to work. Here is the picture of the Percy costume:
https://www.facebook.com/photo.php?fbid=10201668811635273&l=dba7c6f81e
And here is a video:
https://www.facebook.com/photo.php?v=10201668966599147&l=9108836366703245874
Thanks again!
Posted by: Ruth at November 2, 2013 12:56 AMOh, and one more thing I forgot to add, I added a another box to the back so that it could hold candy. You can see it here:
https://www.facebook.com/photo.php?v=10201668956878904&l=495711778502365448
That is an excellent costume, by any chance can you forward me the image of the face you found in large format you did in photo shop. Thanks a bunch.
larsens1018@juno.com
thanks for the ideas. i am going to try this, but not the whistle sound,it sounds too much work for me. your train looks cute. thanks
Posted by: bhuvana at September 27, 2014 11:29 PMYour Thomas came out great! Thanks for sharing! What did you use for Thomas' actual face?
Posted by: Samantha Timms at October 4, 2014 06:26 PMI'm sorry! I must have just over read about the face the first time through! I found it!!
Posted by: Samantha Timms at October 4, 2014 07:00 PMI'm sorry! I must have just over read about the face the first time through! I found it!!
Posted by: Samantha Timms at October 4, 2014 07:06 PMThank you for posting the link to the face! You are a last minute halloween costume life saver! :)
Posted by: Amanda at October 23, 2014 11:48 AMThanks for posting this tutorial! I made this for my son (minus the whistle) and he was over the moon.
Posted by: Marie at October 30, 2014 08:46 AMThank you so much for the walk through & idea. It took me about 23 nights & 30 hours of work & it was well worth it; my twin boys Alex & Nick loved being Thomas & Percy! http://instagram.com/p/u1vkLDk4p4/ http://instagram.com/p/u1vqrkE4qK/
Posted by: Eugene Stephens @Optimusgene at November 1, 2014 09:53 AMHi Kevin!
Great tutorial! Thank you for sharing it. I'm trying to make a costume for my son for Halloween this year. I checked your page a few months ago, and was able to see the type of paint you used. But the links are no longer working. Can you tell me what kind of paint you used? Was it spray paint, or did you use brush paint? If so, what were the color numbers? Thanks again!
Christina
Your Thomas costume is perfect. I am making one for my 2 year old Grandson that lives 600 miles away. I would greatly appreciate any measurements you could share with me like the finished length finished width and the finished height. Thank you in advance.
Diann
Posted by: Diann at September 30, 2015 07:22 PMHi Kevin,
I love your instructions and how fantastic your Thomas costume looks! I, too, am looking for the specific spray paint colors you used along with any additional measurements (like the length of the tab of the concrete form, the diameter or circumference of the concrete form, etc.) It looks like you haven't responded to the two previous posts in this forum, but perhaps you are responding directly to email. Here's hoping as I am trying to make this costume for this coming Halloween in less than two weeks!
Thanks so much for forging the path and providing inspiration!
-Eryn
Thanks so much for sharing this! I made it for my son and it won best costume. I used red duct tape for the pin striping (I suck at painting straight lines) and some black cord (leftover from my bead necklace crafts) to "stitch" the boxes to each other. I also did the same thing with the concrete form (no amount of glueing seemed to hold that thing on!). Thanks again for posting this amazing costume. My son is thrilled!
Posted by: Renee at October 27, 2015 05:04 PMHey, Kevin. How long did it actually take to make the costume. I guess from start to finish
Posted by: Heather at October 28, 2015 12:44 PM