


November 01, 2012
Halloween 2012 - Homemade Robot Costume

I had a few objectives for this costume:
- Keep it unrestrictive. Most robot costumes are made out of bulky cardboard boxes. I didn't think Darren would put up with anything too cumbersome. This worried me a bit, since boxiness makes it easy to identify a robot.
- Make it easy to get in and out of. If we sent him to school in the costume, I didn't want to burden the teachers with having to deal with it all day.
- Make it sturdy. This would have to survive a day of pre-school, and at least two other wearings
- Involve some kind of electronics -- lights, sounds, movements, etc. Make them somewhat interactive. In particular, Darren wanted "buttons that light up"
- Allow for both cold and warm weather. I don't want him sweltering at school, or having to cover the whole thing in a jacket while trick-or-treating.
Here's the final result:
Main Construction
Not using a box made it a bit challenging to figure out how to mount the lights and gizmos that a robot should have. I decided on using the back pieces from a few dollar-store clipboards, which are made from some kind of compressed cardboard, to make a sandwich board on his chest and back. This gave him full range of arm movements and open sides, while giving me some sturdy mount points, and a boxy robot look. They can also put up with some bumping without giving in like normal cardboard would. Also, it can go over anything, meaning that it would work for both a warm or cold Halloween.

To make the holes for the electronic bits, I used a Dremel, combined with a Dremel drill press to keep the holes straight and clean. The big exception was the slot for the bar graph LEDs, where I used a wood chisel, which was really great on this pressed cardboard stuff. It was able to cleanly tear up one layer at a time.

I painted everything with spraypaint, which looked good, though anywhere I had used tape during the drilling left some marks on the costume. Oh well, noted for next year.
I joined the front and back of the costume using velcro straps. I hear that's what holds C-3PO together. Two go over the shoulders, and two are by his waist. The velcro should make it easy to get into and out of, as well as adjust.
The arm coverings are dryer ducts, attached to the sleeve with velcro. I didn't think Darren would put up with the bulk, but didn't seem to mind.
The electronics
I really wanted the electronic aspects of the costume to make up for the non-traditional shape and set this costume apart. I decided to use an Arduino microcontroller to accomplish my goals of lights, sound, movement, and interactivity. Maybe a freeze-ray, if I had time.
Here's what it looked like inside, when all was said and done.

Below are some more details on each piece:
The candy meter
I bought this cool led bar graph off of eBay, which had 64 leds, and coded the Arduino to use it as a Candy Meter display.
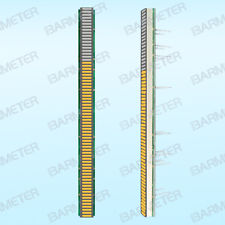
I have it start out fully lit, and then slowly go down as time goes on. When gets to the bottom, it starts to blink to indicate that the robot is hungry for candy. The countdown is pretty fast, as I wanted it to go all the way down between each house while trick-or-treating, to arrive hungry at the next door.
Pressing the blue button (which I got from Sparkfun) resets the meter to the top and flashes the LEDs a few times. I had envisioned much bigger buttons, but I couldn't find any other light-up ones that were cheap enough.
I also added a few alternate animations for the bar graph. Pressing the green lit-up button picks from these randomly, and starts displaying it, and plays a random tone.
Lights streaming out from the middle. Kinda.
So after a bit of research, I bought two shift registers, which allow me to address all 16 pins on the LED array using only 3 arduino pins. Perfect. A lot more digging gave me this site, which has code for controlling an 8x8 LED array, essentially the same thing I'm doing here, except mine are all in one row. One important difference is that he is properly using transistors to ground the cathodes, whereas I'm connecting the cathodes directly to the shift register and setting the appropriate pin to 0 to ground it. I think this is bad form, but I wanted to cut out as many pieces as possible, as more components equals more things that might break.


Sound
I took apart an old cordless land-line phone (an "old-fashioned" phone, as Darren calls them), and salvaged the speaker. Then it was just a matter of hooking it to the Arduino and playing tones. I found the score for the "power-up" sound from Super Mario Bros., and used that for the button press. But it got a bit lost in translation, though, as it doesn't come out as recognizable. It still sounds robotish, though, so I kept it.
Lights
More flashing lights is more better, so I added a group of eight to one corner. They're connected in two groups of 4. I set them on timers of different duration via the Arduino, so that they blink independently of each other. I was trying to get the effect of those hopelessly complex control panels you'd see in Star Wars or Star Trek.


Helmet
I wanted some kind of headgear, but again wanted to avoid a box, as it seems too stifling. I saw a great kid's robot costume here that used an upturned plastic bottle, cut to leave the face completely open. So I went with that approach. A bit late in the process Amy suggested a metal colander, which may have been a better choice, but it was too late by then.
Finding a good-sized helmet was tricky. The best candidate seemed to be a big bleach bottle, but I couldn't find an empty one, and emptying chemicals down the sink just for the container seemed wasteful
I found a bucket at Home Depot.
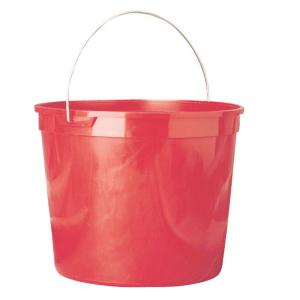
It was pretty big, and slid around quite a bit on his head. So I added in some padding that came with a window air conditoner to make it tighter.
Out of nowhere one day, Darren asks What are we going to use for the antenna? Luckily, I had been working on that very thing. I had a really small motor I had salvaged from somewhere (one of those micro ear/nosetrimmer jobbies, I think. Not that I need one of those.), which was small enough to fit inside the helmet.

I used ShapeLock to mold a little adapter that lets me mount drinking straws to the motors output gear in a nice Y shape.

I used more ShapeLock to make a mount for it inside the helmet, and added a small LiPo battery I had lying around. I also included a potentiometer to control the motor speed -- I didn't want any vibrations or noise to discourage Darren from wearing it.

I really wanted the antenna to light up as well, but couldn't think of a way to make them light up AND spin. I found a solution when a friend of mine gave me some ultraviolet LEDs. I added one of those to my motor circuit, and lined the straws with paper I had colored with highlighter.
It wasn't quite the effect I was hoping for, but still looked good.
This may have been my favorite feature. Unfortunately, it stopped working the minute we stepped out of the house.
LCD screen
The LCD screen is a keychain picture frame I got as a gift a while back, but never used much. I put some robot-esque photos on it, and added it to the costume.
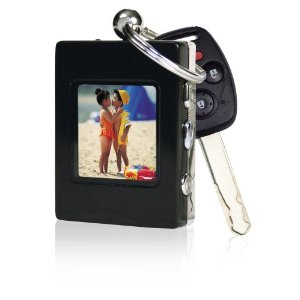

I took the frame apart, and found the contact points for the power button.

I soldered some wires in place, and connected them to a relay. Now the Arduino can use the relay to complete the power button circuit momentarily, and turn the frame on. Every few minutes, it does it again, to turn the frame back on if it's turned off.

I had planned on doing the same to one of the other buttons, so that I could prevent the frame from turning off in the first place, by triggering the button periodically. This also would have let me cycle through the photos at will. But I only had one relay, so I settled for just triggering the power button.
Costume Back
I had all this cool stuff on the front of the costume, but nothing for the back.
I blatently stole the concept from this costume I saw online, and added some soda-bottle fuel tanks to the back. They're hot-glued together and spraypainted to match the costume. (I velcroed them onto the costume itself, so they could be removed for sitting down)

I also impulse-bought these light-up shoelaces on Amazon, since they were just a few bucks. I stuck one into holes at the top of the fuel tanks, just for the heck of it.

All together now
Here's a video where you can see it all in action. Admittedly, it's mostly a video of my daughter, but you can see Darren in there as well. I'll try to put up a better one in the coming days.
For anyone interested, here is my Arduino code (warts and all).
Great costumes! I have to thank you for posting such detailed instructions on last years James costume. I made it for my son this year, and it was a huge hit!
Posted by: Renee at November 3, 2012 12:08 AMNice robot costume, but that awesome bluebird in a nest costume really steals the show. ;)
Posted by: Amy at November 3, 2012 09:51 AMHi,
I contacted you last fall because you inspired me to make a train costume for my son. We wound up making Percy and he came out great! I meant to email then but....life can be hectic. He did so well wearing it a couple of times and loved it! We all did! He even won a Halloween contest. We also removed the steering wheel/sound buttons from a book and put it on it. He could steer it and make noises. We did use the funnel for candy too:) Great idea. The form worked great and the elastic straps kept it from irritating him. My husband and I had a lot of fun making it! Thanks so much for your help! I can send a picture if you are interested.
Love this year's robot!
Alicia
